The inspiration
Two years of lockdown meant international travel so whatever reason was not going to happen… and if it did there was the risk of being stuck somewhere away from home for extended periods. That, and some health issues recovered from (fingers crossed), made me think that, as the world opened up, how was I going to be able to maximise on getting future opportunities to ride? Work would take me far afield and the opportunity to ride in these new places was a huge temptation under the mantra of make every opportunity count. That said anyone who has ever travelled with a bike bag knows what a pain it can be. Hard cases can be a nightmare to get into a taxi and, although easier, soft cases come with a higher chance your precious bike could be damaged. Additionally there are the airline fees for the oversize bag and they can soon add up. Rentals are let that reliable so this did not seem like an option for me. So I wanted find a way where I didn’t have to use a bike case of some sort, that would be a hassle to lug around, and make the journey more complex. However I didn’t want to have to sacrifice having a full size bike with 700cc wheels. A folding bike was not going to cut it. Sure they are fine for cutting across urban jungles but not gravel trails and more. As such it would have to be a bike that could be broken down into a non oversize case that would be easier to travel with.
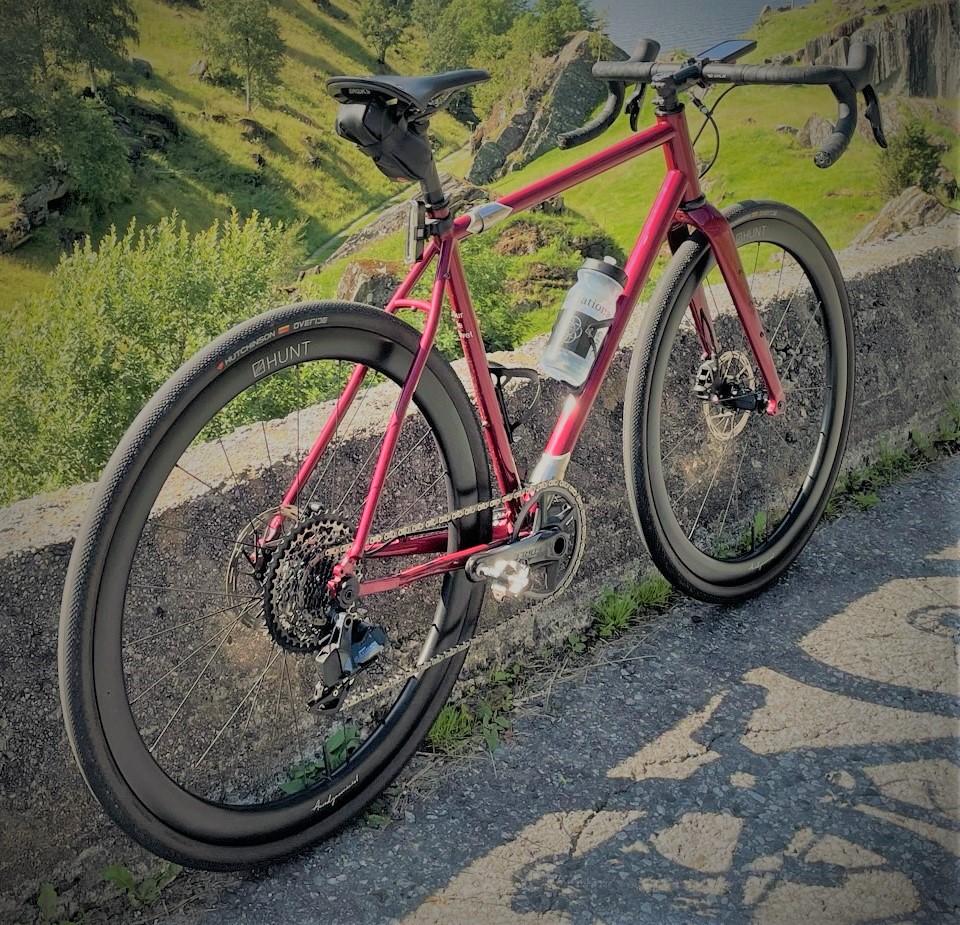
There are really two main options to meet all the above. The Ridley breakaway has a rather cunning system by which the seat tube top acts as one point where the frame can be parted and a coupling at the base of the down tube. There was however a problem. My vanity…. It just did not look right to me. It just looked a bit dated and I had a vision of trying to build something that would look super clean. The ones I saw online, both new and second hand, were not fulfilling that vision. So to the other option which is the bicycle torque coupler made by S&S and hence often called the S&S coupler. These bayonet style couplers, with a lock ring to secure them, can be retro fitted into many bikes. However may of the ones I saw online again didn’t look right. Many of the bikes fitted with them looked slow. I have no issue with slow, I am not exactly fast, but it doesn’t mean the bike has to look slow! After so much research to find the right frame I came across the bike builder that would make me take the plunge and build to bike. Shand is a small bike manufacturer based in Bathgate just outside Edinburgh. It seemed a bit like fate as I had studied at my company’s training facility literally 1 km away from their shop some near 30 years ago. They have one bike, the Stooshie, that hit all the right spots for me. Light for steel, with the couplers and just so fantastic looking. The price did worry me a little as I was gambling a bit that this would be the bike for me. I did my research and it seemed the reviews were good but a slight niggle that perhaps the steering wasn’t as responsive as possible. That said I wanted this to be the one bike that could basically do it all. To be able to do fastish weekend rides with CICC, to tour, to bike pack and to do some gravel if needed. Tall order when you consider also wanting to to fit in small case!
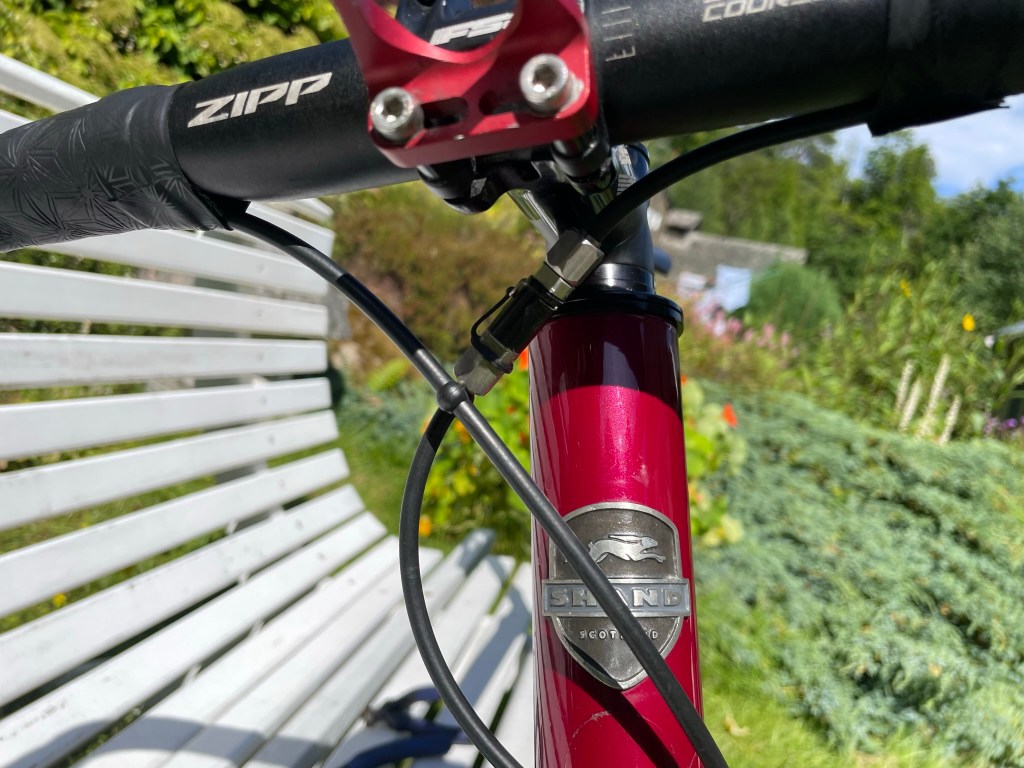
The guys at Shand were a pleasure to deal with and the frame was ordered. Custom paint with a small Sur Le Rivet on the back of the seat tube. Normally I am perhaps boring by only going with black bikes but that said black normally looks awesome. The Stooshies I saw in black didn’t see to do it justice compared to some other colours I had seen so I decided on a metallic burgundy. Again another risk for someone so particular, especially when I had not seen the actual colour but hope helps.
Now came the real nightmare of ordering the components to make the bike. I say nightmare but how can ordering new bike bling be a pain… It wasn’t but the component shortage (2022) did not make life easy at all and multiple web searches and different suppliers had to be used. Here are some of the choices I made for the do it all bike.
Groupset
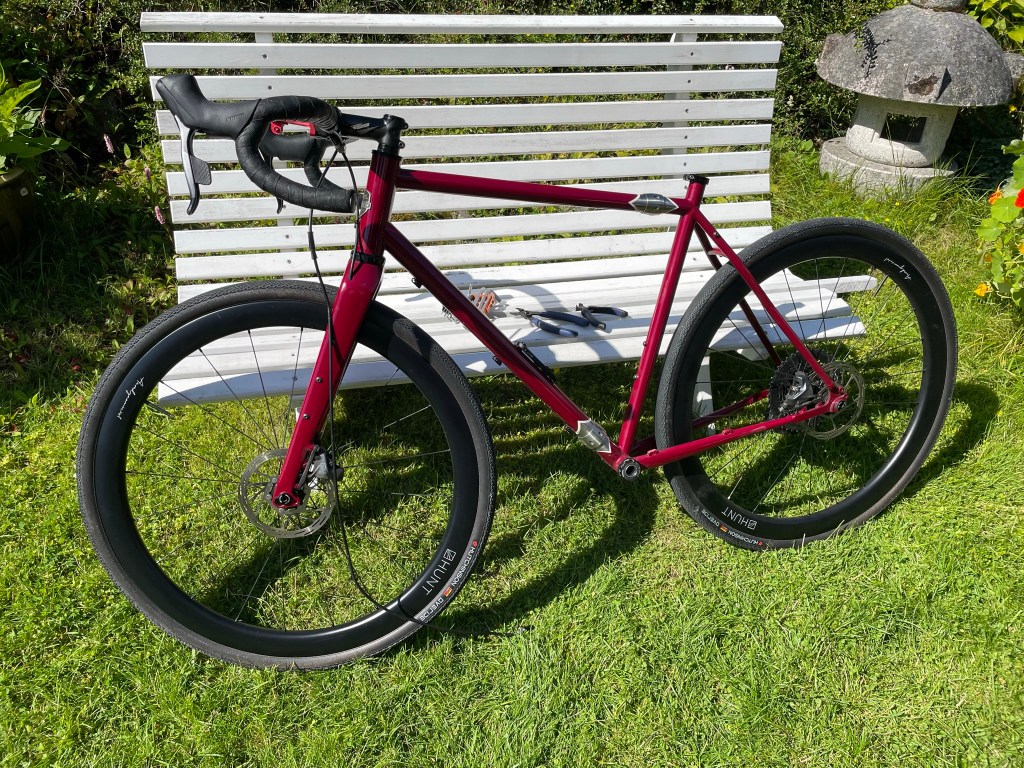
I was really keen on the idea of going one by and not having a front derailleur. It would just be another component to come off when packing the bike so I this was my starting point. Another ambition was to avoid as many cables and lines going to the back of the bike and so wireless shifting seemed the best choice. This guided me to SRAM etap and the choice became their Force group set. This bought the additional benefit of 12 gears on their XTR rear cassette. One of the main moans people have about 1x is the steps between gears being too much. This seems more of an issue for those who seem to have a real cadence issue. I have 1x with 11 gears on my Canondale Slate and it did not feel like it would be an issue for me. I did consider if Shimano Di2 could be an alternative but SRAM really seemed like the right option. Even more so after I made the order when Shimano decided to stop Di2 support for Hammerhead bike computers as SRAM had purchased them. This really puts the consumer second and I cannot see them make such a move with the likes of Garmin. Perhaps Shimano are loosing tough with their users. The new 105 wireless group set, with no mechanical option, with a huge price differential to the prior generation is another example. I don’t think I’ll be looking at Shimano again. As to gear ratio I wanted a bit more that I had had before. So I chose the 10-44 rear with a 40 tooth chain ring up front. Perhaps if I have a super heavy bike packing set up I might need a 36 upfront but changing out the ring on the force is simple. The bottom bracket was a simple BB with a 24 mm spindle. The crankset came with carbon cranks to keep weight down. Did I mention the other target I had in mind to keep this steel build below 10 Kgs? I did mess up on the Crank set the first time by ordering the SRAM dub system but the 28mm spindle was not going to fit. The joys of messing up on components selection!
Brakes
The 10 kgs target would perhaps have been better suited to the choice of rim brakes but I do love the performance of disk brakes and I didn’t want the cables associated with rim brakes. Some of you might scratch your head, thinking well you’ll still have to handle the hydraulic lines. I had decided this would be dealt with by using hydraulic quick connectors but finding the right one online was not easy. Eventually I found the Zen Quick link and ordered it but worried if it would leak. Leaking hydraulic lines are not a great idea for so many reasons, safety being one! I had asked Shand if they could modify the frame so I could internally route the line but they quickly said no way. With the steel tubes being so lightweight they basically said it would compromise the structural integrity of the frame. At first I was a bit down that the bike look wouldn’t been as clean as possible. I am no internally route everything fan, it complicates bike servicing greatly. Later I discuss the outcome of the single line running to the back of the bike and the look. For packing Shand suggested the rear caliper could come off with the line when the bike was split. That made sense but I didn’t do it for two reasons. Firstly I have damaged a caliper thread before, meaning I had to by a new one, my mistake admitted, but I did not want a repeat. Secondly it might have made it a little burdensome tuning the caliper to disk fit each time. So I went with the quick link and it has proven brilliant. No leaks thus far. I am sure after about 10+ reconnections a hose bleed might be needed but that’s no big deal as its going to take me some time to rack up those 10 trips. Update – these links are excellent and I am 10+ connections so far without reblleding the whole system.
Wheels
One of the most important choices on a bike so no emotional choices here. That said I have always wanted a set of HUNT wheels so the brand decision was made! As mentioned before the intent of this bike was to do a bit of everything but not slowly! Also who does not like the look of deep rims? How deep is too deep became the next decision. A older pair of Reynolds Strike with 60mm had scared the **** out of me on some descents in cross winds, so that’s too deep. 40mm seemed to be the perfect mix and the Aerodynamist 44 seemed to tick all the boxes. The reviews all basically said they were excellent and could handle light gravel. Perhaps if my budget had been bigger, it would have been dedicated gravel wheels but that was not possible now. Having ridden the wheels, equipped with WTB 30mm tubes, I am completely happy with the choice. More than happy… Except for the WTBs… (adding this 5 months later).. they just kept puncturing and despite an awesome ride were not making the cut. I am now on Hutchison 35mm Overrides and they work great.. but not perfect.. I think for chuncky gravel they are perfect.. but don’t feel as fast as one would like on the road.. Perhaps two sets of wheels are needed.
Tubeless or not?
Tubeless was a temptation. You can fly with them easily enough if you deflate them a bit but to fit the wheels in the S&S bike case it looked to me that the tires might need to come off the wheels. This indeed proved the case when I tried the first time so I am glad I had already made the decision to use inner tubes. I picked Tubolito’s which offer many advantages over butyl. Weight, rolling resistance, patchable, easy to carry spare tubes in a small saddle bag… just very expensive! But so much better than dealing with sealant every bike pack.
Other components
I will not go into everything as it’ll bore you but some other key decisions. Flared ZIPP handle bars so the comfort and ease of fitting a bar bag. Supercaz bar tape because it is durable and comfy. Co-ordinated Supercaz bottle cages. Carbon Vision seat tube topped with a carbon rail Brooks Cambium seat.
The unknown bonus
Remember the bit above about the reviews that perhaps the bike was not responsive enough? The Shand supplied forks came with a little trick that is simply awesome. They have a set of flip chips so the geometry can be changed. In a more relaxed mode they introduce perhaps a tiny bit of under steer which will be good when bike packing and touring. Flipped the bike changes character and becomes more responsive. I thought the change wouldn’t be much when looking that the slight change in geometry but it is definitely there and a brilliant addition to the bike. Shand you need to promote this more!
The Outcome?
Well……. I am frricking stoked at the outcome. It is everything I had wanted and perhaps more in that it performs to a level I was not perhaps expecting. Weight is approx 9 ½ Kgs and to be honest the weight issue for my cycling isn’t really the bike. Within days of building it I headed to Norway with it packed in its case. Packing the bike is not simple and takes me approx 45 minutes. Pretty much everything comes off including the rotors from the wheels. Travelling with it was a dream, easy to get into the taxi and wheel around the airport. Stressful in that so much luggage at that time was being lost at airports, but I popped an AirTag into the box just in case. The other worry was security opening the box and not getting it all back in! I did use cargo nets around everything to keep it tidy and the case was opened for inspection on my return flight. Everything was put back in fine. One screw up.. I left the upper parts of the headset at home when packing the bike and nearly chocked when I realised this in Norway. What an idiot, all that work to then screw up and not be able to ride the bike on its first trip. Amazingly a small sports shop in a smaller Norwegian town hidden up a fjord were able to find enough to get me through the trip but lesson learned! Pack very carefully not to forget even the tiniest part that might be essential. It rides brilliantly and climbs very well. It feels reassured descending and the frame response from the steel is a pleasure. It is certainly not slow, and likely I am not doing it justice! It also gets many comments which hits the vanity button for me.. Yesterday a car stopped along side me for the driver to pop out his head and admire the bike with a “une belle machine monsieur!”. It can handle gravel, it speeds along the roads and I am sure it’ll be very capable for bike packing*. Now time to organize more trips with the bike.
*First bike packing trip done – an overnighter in Norway.. 270 km in Hardanger Fjord. Report to come. Surlerivet was fanatastic.
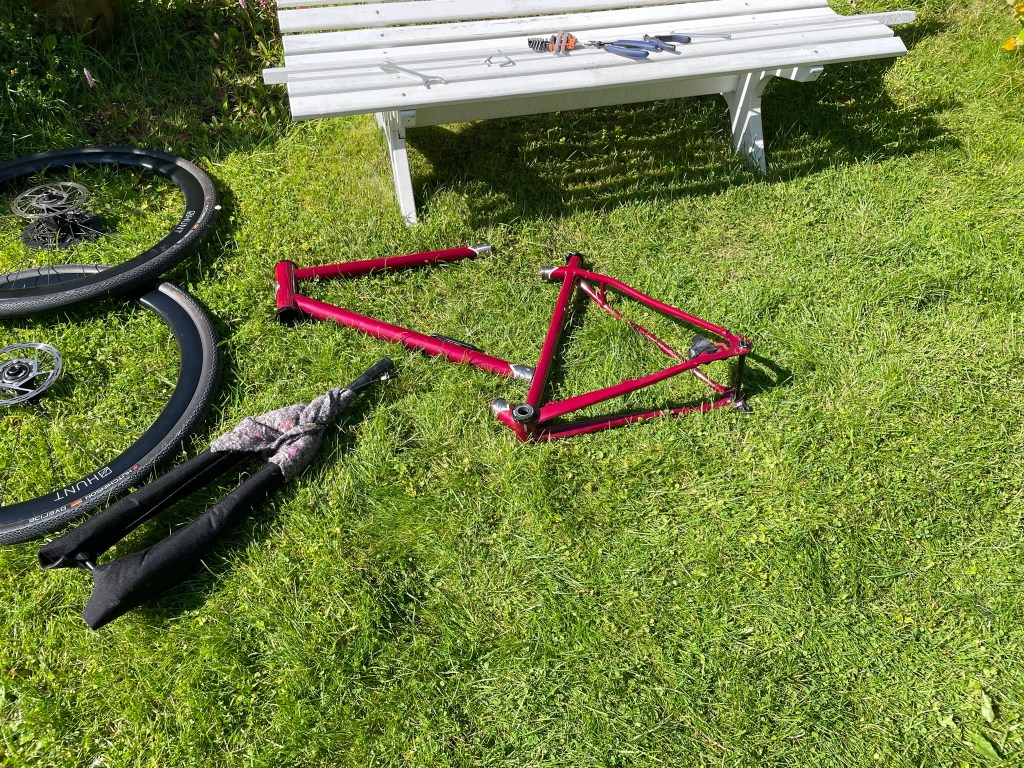
Here’s how in packs away!
Stage one – seat and seat post off, crank out, chain off!
Stage 2 – bars off, hydraulic lines disconnected.
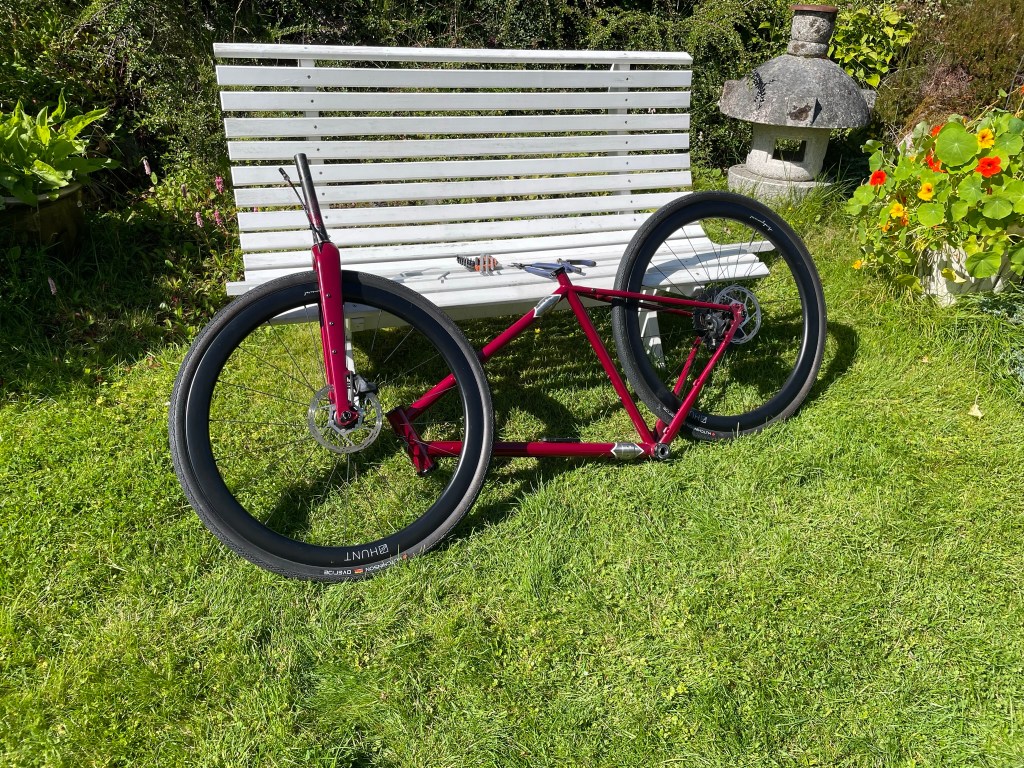
Stage 3 – wheels off, derailleur off, frame broken (well split, not actually broken)..
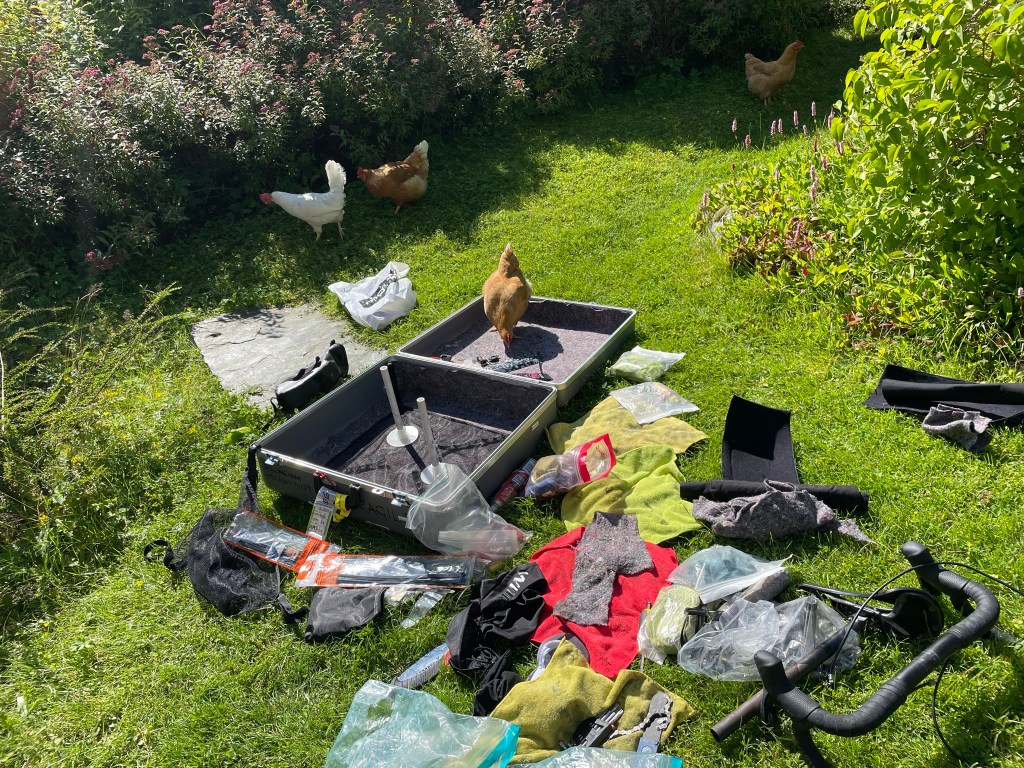
Stage 4 – Chicken’s inspect box for any unwanted insects, seeds… Yes, you do need chickens for this stage
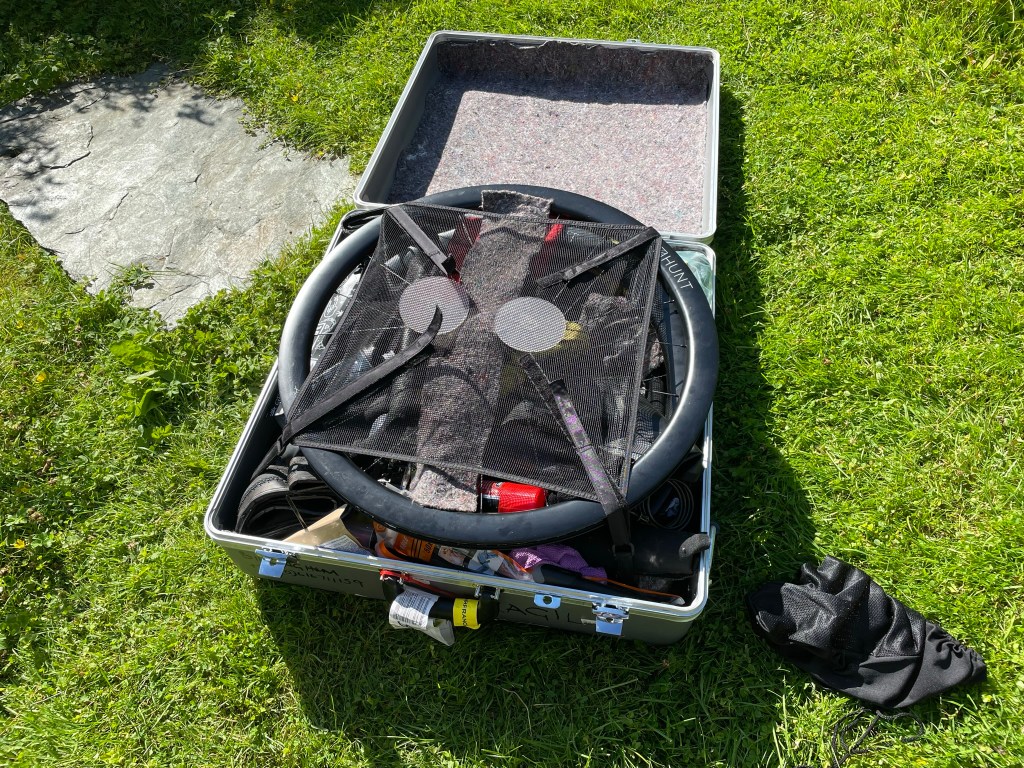
Last Stage – all packed away.. Drop an airtag in it, seriously, it has saved me once already

Leave a comment